Jellyfish with shredded chicken (涼拌雞絲海蜇)
Posted by foodlabasia in Appetizer, Chicken, Chinese on August 15, 2012
Experiment: Jellyfish with shredded chicken (涼拌雞絲海蜇)
Introduction:
I don’t like eating hot dishes in the summer, because it makes me feel a lot hotter than I should feel. While I was looking for something cold to make, I found this shredded chicken dish in a recipe book. I’ve made something similar to this before (click here for the post), basically you just cook the chicken, shred it, and mix it with whatever you like. Hmm… actually now as I’m writing this post, I’m thinking of the another “shredded chicken” dish! haha! I didn’t know “shredded chicken” is so popular in Chinese dishes!
Materials: (serve 6-8)
3 pieces of chicken thigh
1/2 carrot, julienned
1/2 cucumber, julienned
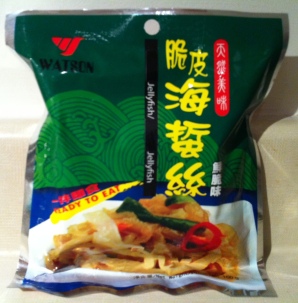
1 pack of ready to eat jellyfish
Sesame seeds
1 pack of Ideal Spicy Bake Mix for marinating the chicken
(Or use salt, pepper and Chinese wine to marinate)
Sauce:
1/4 cup sesame sauce
1 tbsp oyster sauce
1 tbsp fish sauce
2 tsp spicy oil
1 tsp ginger juice
Procedure:
1) Marinate the chicken using the spicy bake mix. Marinate it for 1 hour. (Or overnight if possible.)
2) Boil a pot of water. Put the chicken in when water starts to boil, and then when the water boil again, cover the lid and turn off the heat. Let it sit for 20-30 minutes until cooked.
3) Let the chicken cool and then shred.
4) Prepare the jellyfish as instructed on the package.
5) Julienne the carrot and cucumber.
6) Mix the sauce ingredients in a small bowl.
7) Put the shredded chicken, jellyfish, carrot, cucumber and sauce in a big bowl and mix well. Sprinkle sesame seeds on top. (Or you can mix the sesame seeds with the rest of the ingredients.)
Results:
Discussions:
1) This is the ready-to-eat jellyfish that I got from T&T. I have bought those non-processed jellyfish before… but it took too long to prepare. It’s easier to use ready-to-eat ones.

2) This is the Ideal Spicy Bake mix that I use. I like to use it for marinating chicken.
Spicy tuna tamagoyaki (ツナ玉子焼き)
Posted by foodlabasia in Egg, Japanese, Seafood on August 13, 2012
Experiment: Spicy tuna tamagoyaki ( ツナ玉子焼き)
Introduction:
The Clover Leaf spicy Thai Chili tuna was on sale for $0.99 per can. I couldn’t resist buying a few cans. While I was thinking how to eat it besides the usual “eat it with cracker” way, tamagoyaki came to my mind. Yep! It’s egg again! Hahaha!
Materials:
1 can spicy Thai Chili tuna (85 g)
4-5 eggs
Procedure:
1) Beat the eggs in a bowl. Open the can of tuna and put it in the egg mixture. Mix well. (I took the red pepper in the can out. I don’t wanna bite into the red pepper!)
2) Heat up a small pan. Turn the heat to medium.
3) Brush oil onto the pan. Pour a thin layer of the egg mixture onto the pan. When it’s half cooked, roll one side of the egg to the other side.
4) Brush oil onto the pan again. Lift the tamagoyaki and brush oil under the tamagoyaki as well.
5) Pour a thin layer of the egg mixture onto the pan. Lift the tamagoyaki and let the egg mixture go under the tamagoyaki as well.
6) When the new egg layer is half cooked, you can roll the tamagoyaki to the other end of the pan.
7) Repeat the process of brushing oil, pour in egg mixture, roll the tamagoyaki from one side to the other side until the egg mixture is finished.
8 ) Prepare a piece of saran wrap and place it on top of a sushi mat. Put the tamagoyaki onto the saran wrap while it’s still hot. Wrap it.
9) Roll the sushi mat and shape the tamagoyaki into the shape you want.
10) Let it sit and cool. Cut and serve.
(You can click here for pictures on how to make tamagoyaki!)
Results:
Discussions:
1) You can add some spice into the eggs if you want it spicier. I find that one can of the tuna is pretty good already for 4-5 eggs.
Thai Fish Cake
Posted by foodlabasia in Appetizer, Seafood, Thai on August 7, 2012
Experiment: Thai Fish Cake
Introductions:
I suddenly had a craving for Thai food. I then browsed through the internet and found this recipe (which I modified a little) for Thai fish cakes! The ingredients are easy to find in Asian supermarket, so I went to T&T to grab what I needed. I came home and made it… ok, to be honest, I was a little bit disappointed. Not that the recipe wasn’t good (actually I quite liked the taste), but the fish paste that I got from T&T wasn’t good. It wasn’t “chewy” like the usual fish paste. I’m sure they added a lot of stuff in the fish paste to make the fish paste cost cheaper. Less fish –> not “chewy” and not enough fish taste. Boo~ The texture wasn’t right! Ok maybe next time I’ll substitute the fish paste with shrimp paste… Shrimp paste is not hard to make! (Hmm… maybe I should google how to make fish paste!)
Materials:
350 g dace fish paste
1.5 tsp fish sauce
1 tsp brown sugar
2 cloves of garlic, minced
1 tbsp red curry paste
pepper
1 stalk of green onions, finely chopped
1 stalk of lemon grass, finely chopped
1 tbsp chopped cilantro
Procedure:
1) Mix everything in a medium size bowl. Stir in one direction (only) until all the ingredients are evenly mixed and it becomes like a paste like texture. Cover and put it in the fridge for 30 minutes for the flavour to come out.
2) Scoop a spoon of the fish cake mixture into your hands and roll it into a ball. Flatten. You should be able to make about 10 fish cakes.
3) Heat up a non-stick pan to medium heat. Put the fish cakes in and pan fry for about 3-5 minutes. Flip over and cook for another 3-5 minutes, or until cooked. You can lightly press the fish cakes as you cook.
Results:
Discussions:
1) Well I don’t think I’ll go back to T&T for dace fish paste after this… very disappointed at T&T.
2) Definitely will try it with shrimp! I’m sure I’ll turn out good! hehe!
Reference:
Ho, Christine. Christine’s Recipe http://www.christinesrecipes.com/2010/05/thai-curry-fish-cakes.html?m=1
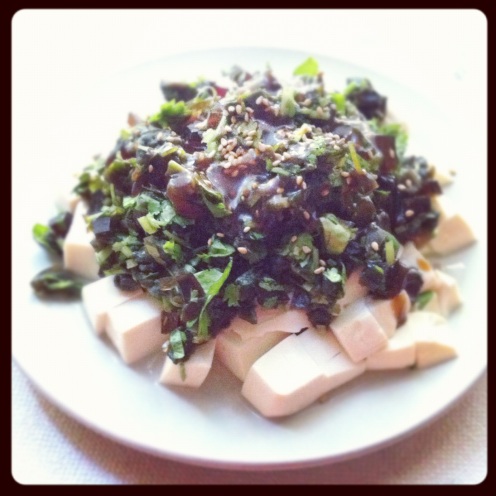
Tofu with thousand year egg (皮蛋豆腐) Version 2
Posted by foodlabasia in Appetizer, Chinese, Tofu on August 1, 2012
Experiment: Tofu with thousand year egg (皮蛋豆腐) Version 2
Introduction:
I haven’t updated this blog for a while. One major major reason is that… I got braces,. Eating has not been fun ever since… >.< If I can’t eat what I cook, it’s not as fun to cook anymore. Hence… lazy to try new recipes. OH well, I think from now on the recipes I try will be mostly soft food! 😦
Anyway. When it comes to soft food, the first thing I would think of is eggs. Even if you “hard boil” it, it’s still relatively soft enough for my teeth. Next soft food that comes to my mind is TOFU! 🙂 So today I made tofu with thousand year egg! Hmm I have made it and posted it before (post is here), but I wanna try another version of it.
Materials:
1 pack of soft tofu
2 thousand year eggs
1 small bunch of cilantro
Sesame (to sprinkle on top)
Sauce:
1 tbsp soy sauce paste
1 tsp sesame oil
2 tsp Chinese dark vinegar
Procedure:
1) Wash the cilantro, finely chop it.
2) Cut the tofu into small cubes.
3) Peel the eggs, and cut it into small pieces.
4) Mix the eggs and chopped cilantro together in a small bowl.
5) Mix the ingredients of the sauce together.
6). Put the tofu on a plate, then put 4) on top of the tofu. Sprinkle sesame on top. Then pour 5) on top. DONE!
Discussions:
1) This dish is very good to be eaten with rice.
2) The picture isn’t that great, because I took it with iPhone… I’m even getting lazier at taking pictures. BAD ME!
Tuna Okra Natto Donburi (マグロオクラ納豆丼)
Posted by foodlabasia in Japanese, Rice on June 7, 2012
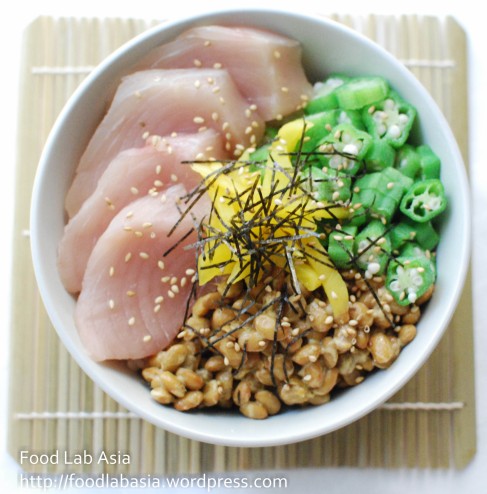
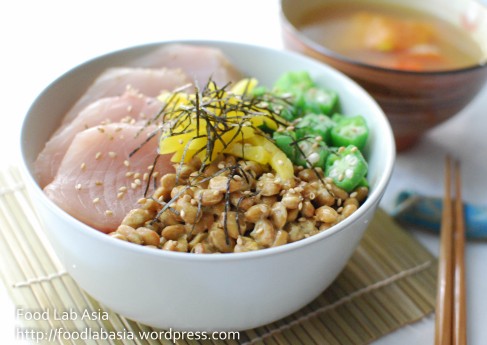
Experiment: Tuna Okra Natto Donburi (マグロオクラ納豆丼)
Introduction:
I went to Guu Konbachi on Denman St few weeks ago with Mr. Clam. One of the dishes that we ordered was Tuna Natto… I forgot the official name. Anyway, it has tuna sashimi, natto, okra and picked daikon in it. I thought, it’d be easy to make at home, and it’d be a a very good rice bowl for the summer, as you don’t really have to turn on the stove. So here, I made it today… 🙂
Some of the dishes from Guu Konbachi:
Materials:
1 bowl of rice
1 pack of natto
5 okra
few slices of pickled daikon
Tuna sashimi
Soy sauce to taste
Seaweed strips
Sesame seeds
Procedure:
1) Wash the okra, then use coarse salt to rub the okra. I read that it helps to remove the tiny hair on the okra.
2) (Optional) Put the okra in a small bowl, then pour hot water in. Cover and let it sit.
3) Cut the okra into small pieces.
4) Thinly slice the picked daikon.
5) Open a pack on natto and mix it well.
6) Put cooked rice in the serving bowl. then put the okra, natto, tuna sashimi and pickled daikon on rice. Sprinkle seaweed strips and sesame seeds on top. Pour soy sauce on top.
Results:
The tuna natto dish at Guu Konbachi (without rice)
Discussions:
1) The okra at Guu was not cooked. I don’t really like fresh okra, that’s why I soak it in hot water to soften it and to get rid of that “fresh” taste.
Apple carrot butternut squash ginger soup (蘋果紅蘿蔔南瓜薑湯)
Posted by foodlabasia in Soup, Western on June 1, 2012
Experiment: Apple carrot butternut squash ginger soup (蘋果紅蘿蔔南瓜薑湯)
Introduction:
I mentioned in my other post that there was this Hong Kong TV show about soup, and the guest chef, Hilda Leung, introduced a soup recipe every episode. One of the soup recipes that she introduced was the apple carrot butternut squash ginger soup. I’m a big fan of butternut squash; I really like the creamy texture of blended butternut squash in soup. Also, butternut squash is supposed to be very god for your body. Hmm… I’m so gonna try this recipe!
I modified Hilda’s recipe a little because:
a) I did’t have all the ingredients on her recipe at home
b) I changed it a little to suit my taste
Materials: (serves 4)
40 g shallots, finely chopped
200 g apples, peeled and diced
200 g carrots, peeled and diced
400 g butternut squash, peeled and diced
30 g ginger, peeled and diced
150 g ham/sausage (or some kind of meat)
1 tbsp dried rosemary
1 tbsp butter
2 L water
Salt
Pepper
Procedure:
1) Heat up a medium size pan. Melt the butter. Put the shallots in and stir fry until the fragrance comes out. Put the apples, carrots, butternut squash and ginger in. Stir fry for about 2 minutes.
2) Put water in, then add the dried rosemary. Cook for about 20 – 30 minutes.
3) Use a hand held blender to blend the soup.
4) Put the ham/sausage in and cook for another few minutes.
5) Add salt and pepper to taste.
Results:
Discussions:
1) I really like this soup! I like butternut squash, I like ginger, and I like apples! My faves in one soup! Perfect!
2) You can add cooked macaroni in the soup for a more filling meal. That’s what I do when I can’t finish the soup on the first day! 🙂
References:
Leung, Hilda. Pretty soup brewer. http://programme.tvb.com/foodandtravel/prettysoupbrewers/i_info/125160/7/1381
Leung, Hilda. Cookaholic Journey by Hildada. http://www.facebook.com/CookaholicJourney
Leung, Hilda. Sina. http://www.weibo.com/hildaleung
Braised pork belly with Chu Hou sauce (柱候五花腩)
Posted by foodlabasia in Chinese, Meat on May 28, 2012
Experiment: Braised pork belly with Chu Hou sauce (柱候五花腩)
Introduction:
I bought the Che Hou sauce for making beef brisket a few months ago. After that, the bottle had been sitting in the fridge doing nothing. Well I thought, since I have the pork belly at home, might as well use the chu hou sauce to braise the pork belly. I used a pressure cooker to cook it which took me like 20 minutes. Quick dinner dish! 🙂
Materials:
1-1.5 kg pork belly
1 radish
1 carrot
100 g shallots
4 tbsp Chu Hou sauce
1 tbsp soy sauce
1 tbsp Chinese wine
1 small piece of rock sugar
1-2 anise
water
Procedure:
1) Peel the radish and carrot. Cut into bite site.
2) Cut the pork belly into big pieces. Pork belly shrink after it’s cooked, so don’t cut it too small.
3) Put all the ingredients in a pressure cooker. Pour water in, covers about half of the ingredients. (water comes out from the carrot and radish so you don’t have to put in too much water)
4) Let it cook…
Results:
Discussions:
1) You can substitute pork belly with beef brisket. Actually you can put any type of stew meat in!
Natto Toast (納豆トースト)
Posted by foodlabasia in Breakfast, Japanese on May 21, 2012
Experiment: Natto Toast (納豆トースト)
Introduction:
Natto is a very popular breakfast dish in Japan. People usually eat it with rice in the morning. However, as you know, it takes time to cook rice. What if you sleep in in the morning and you have no time to cook rice??? Well, here comes a solution – serve the natto on toasts. You just pop a piece of bread in the toaster and wait for 30 seconds or so. In the mean time, you open the package of natto, put all the packaged condiments in, and stir the natto until LOTS of strings form from the natto. When the toast is ready, you put the natto on top of the toast, and serve. Hmm… a good breakfast in less than a minute!
Materials:
1 package of natto
a piece of bread
Procedure:
1) Put the piece of bread into a toaster.
2) Open the package of natto. Put all the condiments that come with the package in the natto.
3) Use chopsticks (or fork) to stir the natto for about 30 seconds or until you see lots of strings form.
4) Spread the natto evenly on the toast.
Discussions:
1) Oooooh I think I forgot to mention what natto is. Natto is fermented soy beans. It has very strong taste and smell. Even in Japan, not every one can take that strong taste of natto.
2) There are many different kinds of natto out there. Lately my favourite is the “dark vinegar with plum” flavour. I really like plum flavoured food, so I was very happy to see that there are actually plum flavoured natto!
Omusoba (オムそば)
Posted by foodlabasia in Egg, Japanese, Noodles on May 15, 2012
Experiment: Omusoba (オムそば)
Introduction:
I don’t know if I have mentioned it before, but I LOOOOVE eggs. Anything tastes better with eggs don’t you think? Anyway, I got some egg noodles from my Number 1 Fan’s mom (THANKS Number 1 Fan’s mom!!!), so I decided to make omusoba with the noodles. In case you’re wondering what “omusoba” is, it’s “omelette soba,” which means soba wrapped in omelette. Japanese call it “omu-soba.” Another version would be “omurice.” I think omurice comes before omusoba… but who knows!
Anyways, I used egg noodles instead of soba for this dish. Feel free to substitute it with soba.
Materials: (serve 2)
egg noodles (portion for 2)
1/2 onion, thinly sliced
2 stalks green onions, cut into 2-inch size
ham (as much as you like)
Oil
2 tbsp worcestershire sauce
2 tbsp okonomiyaki sauce
1 tsp chilli oil
white pepper
2 eggs
Okonomiyaki sauce
Mayonnaise
Nori
Bonito flakes
Procedure:
1) Boil a pot of water. Cook the noodles until soft. Drain.
2) Heat a frying pan, put some oil in, then put in the onion and green onions. Stir fry until the fragrance comes out. Put in the noodles and ham and cook..
3) Put the worcestershire sauce, okonomiyaki sauce, chilli oil and white pepper in. Mix well with the noodles.
4) In a small bowl, beat the two eggs.
5) In another frying pan, pour in the 1/2 of the egg mixture. When the egg is ready, put the noodles in the centre, then wrap the egg around the noodles. Repeat for the remaining half of the egg mixture.
6) Put the mayonnaise, okonomiyaki sauce, nori and bonito flakes on top. Serve.
Results:
Discussions:
1) You can use ketchup to substitute the mayonnaise and okonomiyaki sauce.
2) If you don’t wanna wrap the noodles, you can serve it like the picture below: 🙂
Onion fried eggs rice bowl
Posted by foodlabasia in Japanese, Rice on May 10, 2012
Experiment: Onion fried eggs rice bowl
Introduction:
I was browsing through cookpad one day, and I saw this recipe. It has two of my favourite foods – eggs and plums, and the presentation of the rice bowl was so good! I gotta give this recipe a try! Although it’s a fairly simple dish, it did take me longer than expected to make because of the presentation. OH well, I guess, pretty presentation does make food taste better!
Materials: (serves 2)
2 bowls of cooked rice
2 Japanese preserved plums
Bonito flakes
Sesame seeds
1/2 onion, thinly sliced
2 eggs
1 tbsp mayonnaise
1 tbsp sugar
1 tsp Soy sauce (or mentsuyu)
black pepper (to taste)
7-flavour powder (to taste)
oil
Procedure:
1) Remove the seeds from the plums. Chop the plums into small pieces. Mix with rice.
2) In a small bowl, mix the eggs, mayonnaise, sugar, soy sauce (or mentsuyu), black pepper and 7-flaovour powder together.
3) Heat a small frying pan, add oil. Put the sliced onions in and stir fry until the onions brown a little. Put the egg mixture in. Stir fry until the egg is cooked.
4) In a bowl/plate, first put the rice with plum in, and then put the onions and eggs on top of the rice. Sprinkle bonito flakes and sesame seeds on top.
Results:
Discussions:
1) While I was taking picture of this dish, I suddenly thought of “ochazuke” (お茶漬け). I think I can totally transform this dish into ochazuke by pouring hot green tea in, and it would still taste good! Must try next time!
References:
梅おかかご飯の新玉葱の炒り卵のせ. http://cookpad.com/recipe/1705307


